Sunday, September 27, 2015

Photoshop Techniques - Image that is black and white, plus color

If you would like to have some of the photo black and white, but yet bring emphasis to an area by having some color, this is one technique to achieve this effect. First, right click on the background layer, and select duplicate.


Next, select image from the menu bar, and go to hue\saturation.

Take the saturation all the way to the left. This takes all of the color out of the photo.


At the bottom of your layer palette\window, you will see the layer mask icon. Select it, and then a white box will appear on your layer.


Select your paint brush from your tools, and make sure your colors are black and white. Look at the left of the screen, and make sure the correct paintbrush, and colors match this example.

Use your paintbrush to paint the area that you would like to be in color. Remember, black takes away and white brings it back. A layer mask is only hiding what is underneath that layer. There is a color layer underneath, so it is uncovering it as you paint. If you want to bring back the black and white portion, make your brush white, and paint over that area. The black and white image will reappear.

If you want your photo to change from color to black and white (gradient), this is another technique. Instead of using the paintbrush, use your gradient tool. Look at the example, and select the black to white box (gradient tool).

Simply click and drag where you would like your photo to transition from black and white to color.

Photoshop Techniques - Keeping object in focus, filter on the background

First step is to duplicate the background. Right click on the background layer, and select duplicate.

Then you will select the lasso tool. If you click and hold, you will see three different options. Use either the polygonal, or magnetic tool. Once you have selected the lasso tool, begin to outline the subject you want to keep in focus\clear. Be sure you go around the whole subject and connect it.

After you completely outline the subject, you will see "marching ants." Marching ants are moving dashes. This means you are ready for the next step.

Go to edit, then select copy, and then go back to edit and select paste.


Look at your layers palette (window). You will now see that the image is on a layer of its own. This means you can move it, apply effects to it, make adjustments, etc.

Select your background copy layer. Look at your layers palette\window.


Now you can select filter from the top menu bar. Under filter, there are many options you may use to apply effects to your background. This will not affect your subject because it is on a layer of its own.

A blur filter was applied to the background. Notice how the subject stayed in focus because it is on a separate layer.

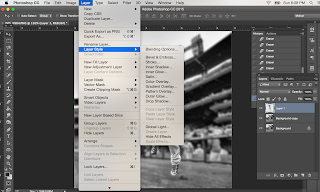
If you would like to apply different effects to the subject, select that layer from the layer palette\window. Go to the layer in the menu bar, select layer styles, and choose an effect.

This is an example of using an outer glow to create more attention to the subject matter. Also, if you need to adjust levels, curves, etc, just select the correct layer and apply necessary adjustments.

Wednesday, September 23, 2015

Step by Step Directions for Making a Contact Sheet


First step to making a contact sheet is to create a new document. Go to File, then New. Match your box with the same numbers as above. This will give you your white canvas (page).

Step two is to open your photo. Go to File, Open, and select your photo. If your white box disappears, look in the upper right corner for the double box. Click it, and your white box will reappear.

Go to image, image size, biggest number under document size, set to 4.

Use your arrow\move tool, to click, drag, and drop it onto your white box. Once there, if you need to resize it, go to Edit, Transform, scale.

Now that you have your photos on your white box, you are ready for effects. Remember to look at your layers. They are on top of each other, so if you want one to overlap another, click and drag that layer on top.

If you need to edit photos, go to the correct layer on the right, and then select Image, Adjustments, and work with levels, curves, hue saturation. These will help make your photos stand out and have correct exposure.

In order to create borders, shadows, glows, etc around your photos, go to layer, layer styles.  This will affect what happens around your image. It will make your photos stand out from the background.

These are some of the layer style effects. For your background, double click on the background layer, and then hit OK. This will unlock your layer and allow you to make changes to the background.

Select the T from your toolbox. This will allow you to add text. Remember that your layers stack on top of each other. If your text is not showing up, drag the text layer to the top. Your text will then appear on your contact sheet.

When you are done working for the day, or are finished, you need to save your file. Go to file, save, and then make sure it has either your ID number at the top, or my InFolder, title your file, and hit save.