Sunday, May 8, 2016
Saturday, April 16, 2016
Social Issues
Social Issues
A social issue (also called a social problem or a social situation) is an issue that relates to society's perception of a person's personal life. Different cultures have different perceptions and what may be "normal" behavior in one society may be a significant social issue in another society.
Examples:


Examples:
Academic Freedom
Adoption
Advertising, children's
Affirmative Action
Ageism
AIDS/HIV
Air Pollution
Airline Issues
Alcohol Abuse
Animal rights
Anti-Muslim Discrimination and Violence
Anti-Semitism
Arson
Arts Funding and Censorship
At Risk Students: Higher Education
Attention Deficit-Hyperactivity Disorder
Autism
Automobile and Highway Safety
Bi-lingualism
Birth Control
Campaign Finance Reform
Cancer
Capital Punishment
Census Issues
Cheating, academic
Child Abuse and Molestation
Child Labor
Chronic Fatigue Syndrome
Church-State Separation
Civil Liberties
Civil Rights
Coastal Pollution and Wetlands Protection
College Sports
Computer Crime, Hacking
Consumer Debt and Bankruptcy
Corporal Punishment
Corporate Crime
Crime
Criminal Rights
Cults and Alternative Religions
Defense Spending and Preparedness
Deforestation and Logging
Disability Rights
Divorce and Child Support
Domestic Violence
Downsizing, corporate
Drought and aquifer depletion
Drug Abuse
Drugs, War on
Eating Disorders
Energy Dependency
Environmental Justice
Environmentally-inducred Illness
Euthanasia
Evolution Education
Extinction and Species Loss: Biota Invasion and Habitat Destruction
Farm crisis
Food and Drug Safety
Foster Care
Gambling
Gangs
Gay and Lesbian Rights
Genetic Engineering
Gentrification
Global Warming
Gun violence and gun control
Hate Crimes
Hate Internet and Radio
Hate Speech
Health Care Reform
Heart Disease
Homelessness
Housing costs
Human experimentation
Identity Theft
Immigration
Immigration, Illegal
Indoor Pollution
Infectious Diseaseand Epidemics
Infrastructure Deterioration
Intellectual Property Rights
Journalistic Ethics
Judicial Reform
Juvenile Justice
Legal Services for the Poor
Literacy
Mandatory Sentencing
Marijuana
Mass Transit
Media Bias
Media Consolidation
Media Sex and Violence
Medical Malpractice
Medicare and Medicaid Reform
Medicine, alternative
Mental Illness
Migrant Workers
Militia Movement
Minimum and Living Wages
Money Laundering
N(ot) I(n) M(y) B(ackyard) Y(ard) Issue
Native Americans and Government Policy
Natural Disasters and Disaster Relief
Noise Pollution
Nuclear Power and Waste
Nuclear Weapons
Obesity
Occupational Safety and Health
Organ and Tissue Transplants
Organic Foods
Organized Crime
Plagiarism
Police Abuse and Corruption
Poverty and Wealth
Prison Reform and Prisoner Rights
Privacy
Prostitution
Public Opinion Polling
Racial Profiling
Rape
Recycling and Conservation
Red-lining and loan discrimination
Reproductive Rights and Technology
Rioting
School Standards and Testing
School Violence
School Vouchers and Privatization
Scientific Research Ethics
Secrecy, Governmental
Sex Education
Sexual Harassment
Single Parenting
Social Security Reform
Space Exploration, costs and benefits
Special Education
Stem Cell Research
Stress
Student Rights
Suicide
Superstores v. Main Street
Sweatshops
Tax Reform
Term Limits
Terrorism, Domestic
Terrorism, Foreign
Terrorism, War on
Tobacco and tobacco-related health issues
Tort Reform
Toxic Waste
Traffic Congestion
Unemployment
Unions
Urban Sprawl
Veterans' Issues
Voluntarism and Volunteering
Voting Issues
Waste Disposal
Water Pollution
Weapons of Mass Destruction
Welfare and welfare reform
Wilderness Protection
Women's Rights
These are just examples, so research and find one that interests you.
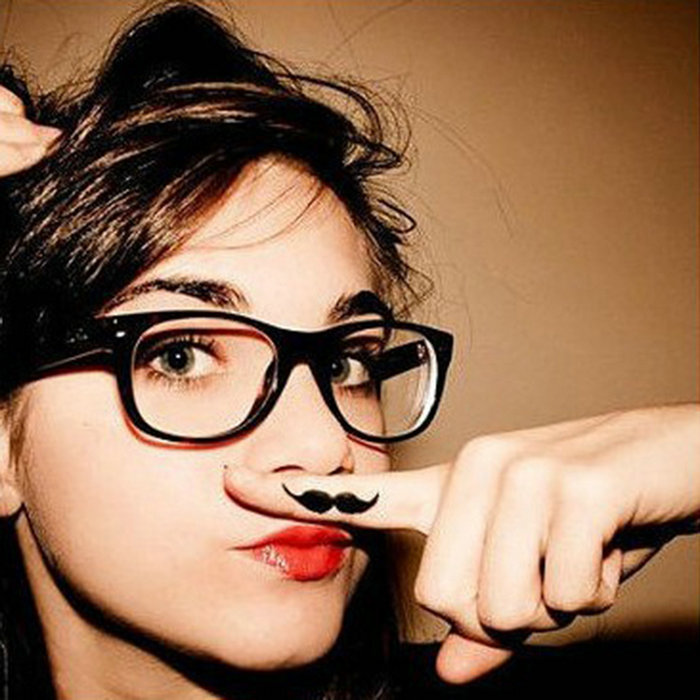
Project: Students will create a poster portraying their social issue. The main focus
must be a photo they have taken this year. Students may incorporate other elements
such as those from the internet. When the audience views the poster, they must
understand what the social issue is and the view that is being expressed.
Examples and artists who work with social issues.
Shepard Fairey, Ron English, Banksy, Barbara Kruger, Isil Egirkavuk, Keith Haring,
Jenny Holzer


Student Examples


Studio Lighting
Students will be using studio lighting to complete two assignments. They must shoot a portrait using a creative prop. Student should research different types of poses that would work with their subject. They will submit three photos for their creative prop shoot.
The second assignment is a product shoot. Students will select a product that they must shoot using studio lighting. Three photos will be submitted for this project. Students will research different lighting techniques that will enhance their product.
Students may use any Photoshop techniques into their final image.


Links to lighting techniques
http://www.diyphotography.net/5-different-setups-nail-2-lights-product-shot/
http://learn.lindsayadlerphotography.com/free-tutorials/
http://www.diyphotography.net/7-functional-tips-better-product-photography/
https://www.youtube.com/watch?v=B2Mb6poDLvY
https://www.youtube.com/watch?v=-ZmNP2TxUNA
Sunday, April 3, 2016
Tips, Techniques, just a hub of learning material
Have found some youtube videos, blogs, etc, that may be useful. We do not always have the time to watch these in class, but there is some very useful information within each link.
http://blog.jeffcable.com/
https://www.youtube.com/watch?v=ap7qnQHIuXI
https://www.youtube.com/watch?v=qUO2FfHfCuk
https://www.youtube.com/watch?v=7r_Yi7MnJFs
https://www.youtube.com/watch?v=H2nNxaBA6ss
https://www.youtube.com/watch?v=vlbfJNTHlgM (short and super useful tips)
https://www.youtube.com/watch?v=kIRAVKnQuVw (awesome tricks)
SLR Lounge
https://www.youtube.com/user/SLRlounge
https://www.slrlounge.com/store-product/photography-101/
https://www.youtube.com/watch?v=kBR-jt3PYHs&list=PLOO4twNsXoAC9EPqg3L-iTg6zspoI8yxX
Wednesday, March 30, 2016
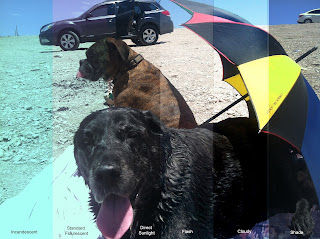
Cornell Notes on Lighting
Click on the links below to find information in regards to lighting.
Basics of Light - fundamentals - list and define
http://www.pinkbike.com/news/basic-light-tutorial-2011.html
Types of Lighting
daylight, continuous artificial light, flash, etc (fireworks, sparks, etc)
Lighting Techniques
http://www.bhphotovideo.com/explora/photography/buying-guide/glossary-lighting-terms
Define the following
white balance - is the process of removing unrealistic color casts, so that objects which appear white in person are rendered white in your photo
direct light
diffused light
back light
front light - light source comes from the front
high key
side lighting - light sources comes from the side
top lighting - light source comes from the top
bottom lighting - light source comes from the bottom
reflector
fill light
flood light
incandescent
key light
Thursday, March 17, 2016
Artificial Lighting
Students will use artificial lighting (not natural from the sun), to take a series of photographs. These photos must incorporate writing on objects or persons. Think of a quote, phrase, poem, etc, and write it on an object or person (must be appropriate and in appropriate locations). There will be a total of four photos. The following lighting techniques must be demonstrated.
Tips for adjusting lighting
http://www.popphoto.com/gallery/top-10-photography-lighting-facts-you-should-know?image=6
Link for direct and diffused
http://www.picturecorrect.com/tips/direct-diffused-light-photography/
http://digital-photography-school.com/three-types-light-diffused-backlight-reflected-use/
http://littlebits.cc/tips-tricks/fridays-tips-and-tricks-ways-to-diffuse-the-bright-led
Direct
Diffused
Link for highlights and shadows
http://www.picturecorrect.com/tips/shadows-highlights-black-white-photography/
Highlights
Shadows
Students will then make a contact sheet with their four photos, and labeling each one.

Then select one of the four photos to manipulate using the techniques we have learned thus far in the year.

If you want to add effects to your lighting, go to the filter option in the menu bar.

You will find options that may help with your lighting to the photo.
Blending Modes
Tutorial
https://www.youtube.com/watch?v=mibCkK1nDpI
Students will learn how blending modes can add effects to their photos. They will have this option to utilize and alter their own personal photos.
First open one of your photos of which you would like to add texture. Next, open a texture image (such as vintage paper, rust, water drops, torn metal, etc). Then drag your texture onto your photo.

Next, look in your layers palette and select the pull down menu that says normal. These are your blending modes.
 Experiment with your different blending modes to see the changes to your photo. Try different textures. Remember, you can always adjust you levels, hue, curves, opacity, etc to your photo to get your desired effect.

https://www.youtube.com/watch?v=mibCkK1nDpI
Students will learn how blending modes can add effects to their photos. They will have this option to utilize and alter their own personal photos.
First open one of your photos of which you would like to add texture. Next, open a texture image (such as vintage paper, rust, water drops, torn metal, etc). Then drag your texture onto your photo.

Next, look in your layers palette and select the pull down menu that says normal. These are your blending modes.


Wednesday, March 16, 2016
White Balance
Understanding white balance
http://www.digitalcameraworld.com/2014/01/31/white-balance-explained-how-your-camera-corrects-the-colour-of-different-kinds-of-lighting/
Students will begin adjusting the white balance on their cameras while shooting in different lighting situations. They will use a photo they have previously taken, and make an example of what certain lighting conditions may look like if the white balance was not adjusted.
What it looks like on the Canon T5

Link to see adjustments or set it manually
http://support-asia.canon-asia.com/contents/ASIA/EN/8202021400.html

 Their example will be printed and inserted into their notebook.
How to correct white balance using photoshop
https://www.youtube.com/watch?v=MUh3vZT0tbo
http://www.digitalcameraworld.com/2014/01/31/white-balance-explained-how-your-camera-corrects-the-colour-of-different-kinds-of-lighting/
Students will begin adjusting the white balance on their cameras while shooting in different lighting situations. They will use a photo they have previously taken, and make an example of what certain lighting conditions may look like if the white balance was not adjusted.
What it looks like on the Canon T5

Link to see adjustments or set it manually
http://support-asia.canon-asia.com/contents/ASIA/EN/8202021400.html


How to correct white balance using photoshop
https://www.youtube.com/watch?v=MUh3vZT0tbo
Channels and Layer Masks to add texture
Video Tutorial
https://www.youtube.com/watch?v=MCZ2cl0CjMk
Students will take two photos. One photo will be of an object or person, and the other will be of something that shows texture. The photo that has texture should be an up close photo of just the texture (rust, erosion, cracks, etc). They will then use their channels layer to create a distressed effect on their photo.
Students will need to use a screenshot to save file. In order to screenshot an image, hit printscreen. Then open paint under the start menu. Select paste, then save as a jpeg.
Step by Step:
Open up texture, go to image, adjustments, hue\saturation. Take the saturation to the left to make it grayscale. Then go to image, adjustments, curves. Make it black and white by taking the points to the bottom and the top. Go to Select (at the top) the hit all. Edit, Copy, and then click on your photo.
Double click on your background layer, hit ok. Go to the top, Layer, New, Layer (make this layer white using your paintbucket). Drag this layer below your photo.
Click on your photo layer, hit Channels (by your layers tab), then look at the bottom. Create new channel (it will appear as a black box). Then go to Edit, paste.
Click on the layers tab so that you see your photo and white background. Click on your photo layer so that it will be highlighted. Hit your delete button on your keyboard, then go to Select, Deselect.
If you would like a different color, go back to Channels. Look for the arrow and lines icon, the hit Channel Options.

Using a layer mask to apply texture
https://www.youtube.com/watch?v=imdxfJrOL-c
 Step by Step:
Drag you photo onto the texture layer. Select the blending mode, change it to mulitply. Then, right click on your background layer (should be your texture) hit duplicate. Drag this layer to the top. So, it should be texture, photo, texture.
The top layer (should be your texture layer) go to image adjustments, hue\saturation, saturation all the way to the left. Hit select, all, edit, copy. Then hit select, deselect.
Then highlight (click) on your photo. Look at the bottom and hit add new layer mask. Hold down the alt button on your keyboard, then click on the white box next to your photo in the layer area. Hit Select, paste. Click on any the eyeball two times of the top texture layer afterwards, and you will see where it was taken away. Hit Select, Deselect
https://www.youtube.com/watch?v=MCZ2cl0CjMk
Students will take two photos. One photo will be of an object or person, and the other will be of something that shows texture. The photo that has texture should be an up close photo of just the texture (rust, erosion, cracks, etc). They will then use their channels layer to create a distressed effect on their photo.
Students will need to use a screenshot to save file. In order to screenshot an image, hit printscreen. Then open paint under the start menu. Select paste, then save as a jpeg.
Step by Step:
Open up texture, go to image, adjustments, hue\saturation. Take the saturation to the left to make it grayscale. Then go to image, adjustments, curves. Make it black and white by taking the points to the bottom and the top. Go to Select (at the top) the hit all. Edit, Copy, and then click on your photo.
Double click on your background layer, hit ok. Go to the top, Layer, New, Layer (make this layer white using your paintbucket). Drag this layer below your photo.
Click on your photo layer, hit Channels (by your layers tab), then look at the bottom. Create new channel (it will appear as a black box). Then go to Edit, paste.
Click on the layers tab so that you see your photo and white background. Click on your photo layer so that it will be highlighted. Hit your delete button on your keyboard, then go to Select, Deselect.
If you would like a different color, go back to Channels. Look for the arrow and lines icon, the hit Channel Options.

Using a layer mask to apply texture
https://www.youtube.com/watch?v=imdxfJrOL-c

Drag you photo onto the texture layer. Select the blending mode, change it to mulitply. Then, right click on your background layer (should be your texture) hit duplicate. Drag this layer to the top. So, it should be texture, photo, texture.
The top layer (should be your texture layer) go to image adjustments, hue\saturation, saturation all the way to the left. Hit select, all, edit, copy. Then hit select, deselect.
Then highlight (click) on your photo. Look at the bottom and hit add new layer mask. Hold down the alt button on your keyboard, then click on the white box next to your photo in the layer area. Hit Select, paste. Click on any the eyeball two times of the top texture layer afterwards, and you will see where it was taken away. Hit Select, Deselect
Tuesday, February 16, 2016
Graduation Program Design
Students will be designing the program that will be used at the graduation ceremony.
Here are a few pointers when designing your program.
https://www.youtube.com/watch?v=t9OTcdc2mwc
https://www.youtube.com/watch?v=9LPHp40jCQY
https://www.youtube.com/watch?v=YOcLUwkncZw
https://www.youtube.com/user/UltramanToronto
Shawn Berry, many tutorials that breakdown different elements


Dimensions for program:
width - 17 inches
height - 11 inches
resolution 300
Here are a few pointers when designing your program.
https://www.youtube.com/watch?v=t9OTcdc2mwc
https://www.youtube.com/watch?v=9LPHp40jCQY
https://www.youtube.com/watch?v=YOcLUwkncZw
https://www.youtube.com/user/UltramanToronto
Shawn Berry, many tutorials that breakdown different elements
Dimensions for program:
width - 17 inches
height - 11 inches
resolution 300
Wednesday, February 3, 2016
Creating a cartoon image using vector masks
Students will use the pen tool to draw a path, and then stroke the path with the brush tool. We will first create an outline of the image before we fill in the parts of the image. This will give it a two dimensional cartoon effect.
https://www.youtube.com/watch?v=w53j_FMhjYA


https://www.youtube.com/watch?v=w53j_FMhjYA

Second Step:
Students will use the pen tool to create a path, and then fill the path with the appropriate color.

Last Step:
Students will finish their cartoon image by adding value. They will use the burn tool for the skin to add shadows. Then add new layers to create shadows and highlights for the rest of the image.

Saturday, January 30, 2016
Using the pen tool to make a selection
When using the pen tool instead of the lasso tool, there is an extra step. Some find the pen tool easier to use when making a selection.
First, select the pen tool from the tool box
 Look on the right at your tool, see highlighted tool, that's the pen tool.
Next, use the pen tool to click around area to that you want to select.
 Make sure to connect the point to the point of where you started from
Then, go to your paths (it is by your layers tab)
 You will see your outline of what you just selected
Then click on the arrow with lines that is in the upper right corner.
 Choose, make a selection, then hit ok
 You will now see the "marching ants", the are dashes that are moving. You can use your arrow (move tool) and drag it to where you want it to be placed.
First, select the pen tool from the tool box

Next, use the pen tool to click around area to that you want to select.

Then, go to your paths (it is by your layers tab)

Then click on the arrow with lines that is in the upper right corner.


Subscribe to:
Posts (Atom)