Click on the links below to find information in regards to lighting.
Basics of Light - fundamentals - list and define
http://www.pinkbike.com/news/basic-light-tutorial-2011.html
Types of Lighting
daylight, continuous artificial light, flash, etc (fireworks, sparks, etc)
Lighting Techniques
http://www.bhphotovideo.com/explora/photography/buying-guide/glossary-lighting-terms
Define the following
white balance - is the process of removing unrealistic color casts, so that objects which appear white in person are rendered white in your photo
direct light
diffused light
back light
front light - light source comes from the front
high key
side lighting - light sources comes from the side
top lighting - light source comes from the top
bottom lighting - light source comes from the bottom
reflector
fill light
flood light
incandescent
key light
Wednesday, March 30, 2016
Thursday, March 17, 2016
Artificial Lighting
Students will use artificial lighting (not natural from the sun), to take a series of photographs. These photos must incorporate writing on objects or persons. Think of a quote, phrase, poem, etc, and write it on an object or person (must be appropriate and in appropriate locations). There will be a total of four photos. The following lighting techniques must be demonstrated.
Tips for adjusting lighting
http://www.popphoto.com/gallery/top-10-photography-lighting-facts-you-should-know?image=6
Link for direct and diffused
http://www.picturecorrect.com/tips/direct-diffused-light-photography/
http://digital-photography-school.com/three-types-light-diffused-backlight-reflected-use/
http://littlebits.cc/tips-tricks/fridays-tips-and-tricks-ways-to-diffuse-the-bright-led
Direct
Diffused
Link for highlights and shadows
http://www.picturecorrect.com/tips/shadows-highlights-black-white-photography/
Highlights
Shadows
Students will then make a contact sheet with their four photos, and labeling each one.

Then select one of the four photos to manipulate using the techniques we have learned thus far in the year.

If you want to add effects to your lighting, go to the filter option in the menu bar.

You will find options that may help with your lighting to the photo.
Blending Modes
Tutorial
https://www.youtube.com/watch?v=mibCkK1nDpI
Students will learn how blending modes can add effects to their photos. They will have this option to utilize and alter their own personal photos.
First open one of your photos of which you would like to add texture. Next, open a texture image (such as vintage paper, rust, water drops, torn metal, etc). Then drag your texture onto your photo.

Next, look in your layers palette and select the pull down menu that says normal. These are your blending modes.
 Experiment with your different blending modes to see the changes to your photo. Try different textures. Remember, you can always adjust you levels, hue, curves, opacity, etc to your photo to get your desired effect.

https://www.youtube.com/watch?v=mibCkK1nDpI
Students will learn how blending modes can add effects to their photos. They will have this option to utilize and alter their own personal photos.
First open one of your photos of which you would like to add texture. Next, open a texture image (such as vintage paper, rust, water drops, torn metal, etc). Then drag your texture onto your photo.

Next, look in your layers palette and select the pull down menu that says normal. These are your blending modes.


Wednesday, March 16, 2016
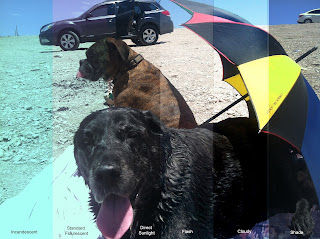
White Balance
Understanding white balance
http://www.digitalcameraworld.com/2014/01/31/white-balance-explained-how-your-camera-corrects-the-colour-of-different-kinds-of-lighting/
Students will begin adjusting the white balance on their cameras while shooting in different lighting situations. They will use a photo they have previously taken, and make an example of what certain lighting conditions may look like if the white balance was not adjusted.
What it looks like on the Canon T5

Link to see adjustments or set it manually
http://support-asia.canon-asia.com/contents/ASIA/EN/8202021400.html

 Their example will be printed and inserted into their notebook.
How to correct white balance using photoshop
https://www.youtube.com/watch?v=MUh3vZT0tbo
http://www.digitalcameraworld.com/2014/01/31/white-balance-explained-how-your-camera-corrects-the-colour-of-different-kinds-of-lighting/
Students will begin adjusting the white balance on their cameras while shooting in different lighting situations. They will use a photo they have previously taken, and make an example of what certain lighting conditions may look like if the white balance was not adjusted.
What it looks like on the Canon T5

Link to see adjustments or set it manually
http://support-asia.canon-asia.com/contents/ASIA/EN/8202021400.html


How to correct white balance using photoshop
https://www.youtube.com/watch?v=MUh3vZT0tbo
Channels and Layer Masks to add texture
Video Tutorial
https://www.youtube.com/watch?v=MCZ2cl0CjMk
Students will take two photos. One photo will be of an object or person, and the other will be of something that shows texture. The photo that has texture should be an up close photo of just the texture (rust, erosion, cracks, etc). They will then use their channels layer to create a distressed effect on their photo.
Students will need to use a screenshot to save file. In order to screenshot an image, hit printscreen. Then open paint under the start menu. Select paste, then save as a jpeg.
Step by Step:
Open up texture, go to image, adjustments, hue\saturation. Take the saturation to the left to make it grayscale. Then go to image, adjustments, curves. Make it black and white by taking the points to the bottom and the top. Go to Select (at the top) the hit all. Edit, Copy, and then click on your photo.
Double click on your background layer, hit ok. Go to the top, Layer, New, Layer (make this layer white using your paintbucket). Drag this layer below your photo.
Click on your photo layer, hit Channels (by your layers tab), then look at the bottom. Create new channel (it will appear as a black box). Then go to Edit, paste.
Click on the layers tab so that you see your photo and white background. Click on your photo layer so that it will be highlighted. Hit your delete button on your keyboard, then go to Select, Deselect.
If you would like a different color, go back to Channels. Look for the arrow and lines icon, the hit Channel Options.

Using a layer mask to apply texture
https://www.youtube.com/watch?v=imdxfJrOL-c
 Step by Step:
Drag you photo onto the texture layer. Select the blending mode, change it to mulitply. Then, right click on your background layer (should be your texture) hit duplicate. Drag this layer to the top. So, it should be texture, photo, texture.
The top layer (should be your texture layer) go to image adjustments, hue\saturation, saturation all the way to the left. Hit select, all, edit, copy. Then hit select, deselect.
Then highlight (click) on your photo. Look at the bottom and hit add new layer mask. Hold down the alt button on your keyboard, then click on the white box next to your photo in the layer area. Hit Select, paste. Click on any the eyeball two times of the top texture layer afterwards, and you will see where it was taken away. Hit Select, Deselect
https://www.youtube.com/watch?v=MCZ2cl0CjMk
Students will take two photos. One photo will be of an object or person, and the other will be of something that shows texture. The photo that has texture should be an up close photo of just the texture (rust, erosion, cracks, etc). They will then use their channels layer to create a distressed effect on their photo.
Students will need to use a screenshot to save file. In order to screenshot an image, hit printscreen. Then open paint under the start menu. Select paste, then save as a jpeg.
Step by Step:
Open up texture, go to image, adjustments, hue\saturation. Take the saturation to the left to make it grayscale. Then go to image, adjustments, curves. Make it black and white by taking the points to the bottom and the top. Go to Select (at the top) the hit all. Edit, Copy, and then click on your photo.
Double click on your background layer, hit ok. Go to the top, Layer, New, Layer (make this layer white using your paintbucket). Drag this layer below your photo.
Click on your photo layer, hit Channels (by your layers tab), then look at the bottom. Create new channel (it will appear as a black box). Then go to Edit, paste.
Click on the layers tab so that you see your photo and white background. Click on your photo layer so that it will be highlighted. Hit your delete button on your keyboard, then go to Select, Deselect.
If you would like a different color, go back to Channels. Look for the arrow and lines icon, the hit Channel Options.

Using a layer mask to apply texture
https://www.youtube.com/watch?v=imdxfJrOL-c

Drag you photo onto the texture layer. Select the blending mode, change it to mulitply. Then, right click on your background layer (should be your texture) hit duplicate. Drag this layer to the top. So, it should be texture, photo, texture.
The top layer (should be your texture layer) go to image adjustments, hue\saturation, saturation all the way to the left. Hit select, all, edit, copy. Then hit select, deselect.
Then highlight (click) on your photo. Look at the bottom and hit add new layer mask. Hold down the alt button on your keyboard, then click on the white box next to your photo in the layer area. Hit Select, paste. Click on any the eyeball two times of the top texture layer afterwards, and you will see where it was taken away. Hit Select, Deselect
Subscribe to:
Posts (Atom)